Migration is a standard process for creating and updating the database from our application. After creating the database model, we can transfer it to the real database. But we need to modify our CreateDbContext method first:
var builder = new DbContextOptionsBuilder<RepositoryContext>()
    .UseSqlServer(configuration.GetConnectionString("sqlConnection"),
        b => b.MigrationsAssembly("CompanyEmployees.Infrastructure.Persistence"));
We have to make this change because migration assembly is not in our main project but in the CompanyEmployees.Infrastructure.Persistence project. So, we’ve just changed the project for the migration assembly. Before we execute our migration commands, we have to install an additional EF Core library in our main project: Microsoft.EntityFrameworkCore.Tools.
Now, let’s open the Package Manager Console window and create our first migration:
PM> Add-Migration DatabaseCreation
This will likely result in an error on your machine:
Your target project 'CompanyEmployees' doesn't match your migrations assembly
'CompanyEmployees.Infrastructure.Persistence'. Either change your target project
or change your migrations assembly. Change your migrations assembly
by using DbContextOptionsBuilder.
E.g. options.UseSqlServer(connection, b => b.MigrationsAssembly("CompanyEmployees")).
By default, the migrations assembly is the assembly containing the DbContext.
Change your target project to the migrations project by using the
Package Manager Console's Default project drop-down list,
or by executing "dotnet ef" from the directory containing the migrations project.
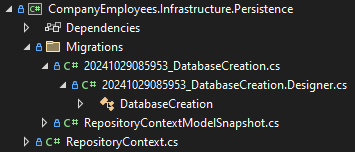
In simple terms, we need to change the default project in our Package Manager console to CompanyEmployees.Infrastructure.Persistence since we’ve explicitly defined the migrations assembly. We can pick the default project from the second dropdown in the Package Manager Console. With this command, we are creating migration files, and we can find them in the Migrations folder in our Persistence project:
At this point, since our migration files are in the Persistence project, we will get several issues and our solution won’t be able to build. This is because the code inside the migration files requires the Microsoft.EntityFrameworkCore.SqlServer package to be installed.
Well, let’s do that, let’s install the mentioned package inside the CompanyEmployees.Infrastructure.Persistence project.
With this done, we can remove the SqlServer package from the main project because the main project references the Persistence project. Due to that fact, it can use the mentioned package as well.
With everything in place, we can apply migration:
PM> Update-Database
And if you get another exception:
System.Globalization.CultureNotFoundException: Only the invariant culture is supported in
globalization-invariant mode. See https://aka.ms/GlobalizationInvariantMode
for more information. (Parameter 'name') en-us is an invalid culture identifier.
You can solve it pretty easily. You need to set the InvarianGlobalization attribute to false in your main project’s .csproj file:
<InvariantGlobalization>false</InvariantGlobalization>
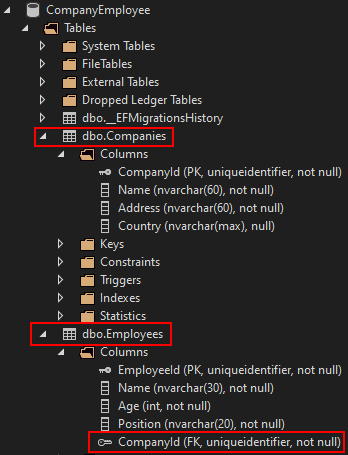
With the Update-Database command executed, the migrations should be applied, and we can inspect our database. In Visual Studio, you can navigate to a View menu and click on the SQL Server Object Explorer option. There, you need to expand your server, expand the Databases folder, and inspect your database to see the results:
Now that we’ve created the database and the tables, we should populate them with some initial data. To do that, we are going to create another folder in the CompanyEmployees.Infrastructure.Persistence project called Configurations and add the CompanyConfiguration class:
public class CompanyConfiguration : IEntityTypeConfiguration<Company>
{
    public void Configure(EntityTypeBuilder<Company> builder)
    {
        builder.HasData
        (
            new Company
            {
                Id = new Guid("c9d4c053-49b6-410c-bc78-2d54a9991870"),
                Name = "IT_Solutions Ltd",
                Address = "583 Wall Dr. Gwynn Oak, MD 21207",
                Country = "USA"
            },
            new Company
            {
                Id = new Guid("3d490a70-94ce-4d15-9494-5248280c2ce3"),
                Name = "Admin_Solutions Ltd",
                Address = "312 Forest Avenue, BF 923",
                Country = "USA"
            }
        );
    }
 }
Let’s do the same thing for the EmployeeConfiguration class:
public class EmployeeConfiguration : IEntityTypeConfiguration<Employee>
{
    public void Configure(EntityTypeBuilder<Employee> builder)
    {
        builder.HasData
        (
            new Employee
            {
                Id = new Guid("80abbca8-664d-4b20-b5de-024705497d4a"),
                Name = "Sam Raiden",
                Age = 26,
                Position = "Software developer",
                CompanyId = new Guid("c9d4c053-49b6-410c-bc78-2d54a9991870")
            },
            new Employee
            {
                Id = new Guid("86dba8c0-d178-41e7-938c-ed49778fb52a"),
                Name = "Jana McLeaf",
                Age = 30,
                Position = "Software developer",
                CompanyId = new Guid("c9d4c053-49b6-410c-bc78-2d54a9991870")
            },
            new Employee
            {
                 Id = new Guid("021ca3c1-0deb-4afd-ae94-2159a8479811"),
                 Name = "Kane Miller",
                 Age = 35,
                 Position = "Administrator",
                 CompanyId = new Guid("3d490a70-94ce-4d15-9494-5248280c2ce3")
             }
        );
    }
}
To invoke this configuration, we have to change the RepositoryContext class:
public class RepositoryContext: DbContext
{
    public RepositoryContext(DbContextOptions options)
    : base(options)
    {
    }

    protected override void OnModelCreating(ModelBuilder modelBuilder)
    {
        modelBuilder.ApplyConfiguration(new CompanyConfiguration());
        modelBuilder.ApplyConfiguration(new EmployeeConfiguration());
    }

    public DbSet<Company> Companies { get; set; }
    public DbSet<Employee> Employees { get; set; }
}
Now, we can create and apply another migration to seed these data to the database:
PM> Add-Migration InitialData
PM> Update-Database
These commands will transfer all the data from our configuration files to the respective tables.


