Course Content
Evolution to Microservices
Throughout our first chapter, we will gain a shared understanding of what a Microservice is, and cover some of the main benefits as well as drawbacks. Finally, we’ll explore some of the situations where we would want to choose a Microservices architecture compared to a monolithic application.
0/6
Designing Our First Microservice
Now that we have a shared understanding of microservices, including the benefits and drawbacks, let’s dive into creating our first microservice. We’ll start by setting up our environment, and covering the domain we’ll be working in throughout the rest of the book. From there, we’ll scaffold our first microservice and implement the business logic to allow other microservices to communicate with it.
0/7
Communication Between Microservices in .NET
So far, we have implemented a Basket microservice as part of our e-commerce application. However, this is only one component of an e-commerce application, so we need to introduce more functionality, which we achieve by creating new microservices. In this chapter, we will cover communication methods between microservices, introduce our second microservice, and implement communication between it and our Basket microservice.
0/7
Cross-Cutting Concerns
In our previous chapter, we introduced some duplicated code around the connections for RabbitMQ. Duplicated code isn’t the end of the world, but as developers, we must ask ourselves whether code can be re-used. Throughout this chapter, we are going to discuss duplication of code in the realm of microservices, as well as some common concerns that affect all microservices.
0/10
Data Ownership
Our e-commerce application is starting to take shape. We have a Basket and Order microservice, along with events that allow for asynchronous communication between the two. However, we currently use an in-memory store for both microservices. This is not reflective of a production microservices environment. Whenever we write applications, be it a monolith or a microservices-based architecture, data is a core component. Without data, most of our applications wouldn’t be very useful. So, throughout this chapter, we are going to understand data ownership in the context of microservices, exploring the replication of data to build more efficient and robust applications.
0/9
Extend Basket Microservice Functionality
Now that we’ve introduced a new service, the Product microservice, to our E-Commerce application, we can extend the functionality of our Basket microservice. We want to be able to display product price information in our baskets, so we need to consume the new ProductPriceUpdatedEvent we introduced in the previous chapter. At the same time, we can introduce a persistent data store for our basket microservice, and tick off another part of our overall architecture.
0/7
Testing Distributed Applications
At this stage, our E-Commerce application is starting to come together, with quite a few moving pieces. However, any time we introduce a new service or change some functionality, we need to manually run tests via Postman or curl, which isn’t very efficient. Furthermore, we cannot easily automate this type of testing, so whenever we get to a stage of continuously deploying our microservices, we’ll be slowed down by this manual testing. As developers, testing is something we should be very comfortable with doing and implementing. Throughout this chapter, we’ll briefly cover the types of tests we can write, focusing on our microservices, as well as implementing various levels of tests to ensure we can continuously add new microservices and functionality to our E-Commerce application.
0/4
Integration Testing With Order Microservice
So far, we’ve covered the base of the testing pyramid with unit tests in our Basket microservice. The next level we need to cover is integration testing, which we’ll pick up with our Order microservice. It is worth noting that we previously asked you to implement a data store for the Order microservice, so things may differ slightly. Of course, the source code is available with an SQL implementation, so feel free to follow along using that configuration. We’ve already covered the scope of integration testing in the previous chapter, so let’s waste no time getting into the code!
0/5
Application Observability
Throughout our journey of building an E-Commerce application using microservices, we’ve composed quite a complex system. So far, we’ve got 3 separate microservices, each with its own data store. Furthermore, we’ve got an external message broker (RabbitMQ) that allows us to communicate asynchronously between microservices. We’ve been able to test each microservice individually, both manually via Postman or curl and in an automated fashion with unit and integration tests. All of these processes are great to help us during local development and provide confidence whenever writing new features, but what about whenever our application is in production? Right now, if we deployed our application and allowed customers to use our E-Commerce platform, we’d have no insight into the performance of our application. We’d also have no idea how data flows through our application beyond what we have tested ourselves. This is where observability comes into play.
0/7
Monitoring Microservices With Metrics
In the previous chapter, we started considering how to monitor our microservices whenever deployed in a production environment. The first telemetry component we covered was tracing, which gives us contextual information for our microservices and external infrastructure. This information is useful when we need to dive deep into a problem, but it doesn’t provide an easy-to-understand overview of our service’s performance. This is where metrics come into play, which we’ve already gained an understanding of, so let’s waste no time implementing metrics in our Order microservice.
0/3
Building Resilient Microservices
So far, we’ve designed a system that provides us confidence when releasing new features thanks to testing. We’ve also gained insight into how our application performs when deployed with the help of OpenTelemetry tracing and metrics. With this last component, we’re likely to see recurring failures between microservices and our external infrastructure such as SQL or RabbitMQ.
0/6
Securing Microservices
Throughout the development of our microservices, every request we executed was unauthenticated. However, this needs to be revised for a production-level E-Commerce application. Although we can allow anonymous access to create baskets and add products to them, we cannot allow everyone access to create products or update product pricing. Therefore, we need a mechanism to secure certain endpoints, which we’ll achieve by introducing two new services to our system. Let’s start with an understanding of the different components of security.
0/6
Microservice Deployment
We’re now at a stage where we have a pretty sophisticated system, with many components, tests, and features. The next logical step for any application, microservice-based or not, is to tackle deployment. We need a solution to help us with microservice deployment complexities. But first, let’s briefly touch on the differences between monolithic and microservice deployments.
0/5
Microservices in .NET

As our shared library package isn’t published to a hosted server, we need to add a new source pointing at our local-nuget-packages folder, so let’s start with that.

Add Local NuGet Feed

To use our local NuGet folder as a feed in our microservices, we need to create a nuget.config file at the same level as our solution, specifying a new source:

<?xml version="1.0" encoding="utf-8"?>
<configuration>
  <packageSources>
    <add key="local-nuget-packages" value="../local-nuget-packages" />
  </packageSources>
</configuration>

Here, we add a new entry in <packageSources>, pointing to the folder that contains the ECommerce.Shared NuGet package.

Now we can install our package locally:

dotnet add package ECommerce.Shared -v 1.0.0

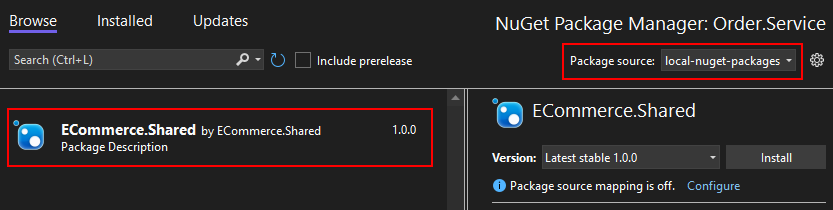
If installing via Visual Studio, we need to ensure we’ve selected the correct Package source from the drop-down in the NuGet Package Manager:

At this point, our project will build fine if we attempt to do so from the command line or Visual Studio. However, if we attempted to build from Docker, we’d run into some issues as we haven’t copied our local NuGet package into the Docker image, so let’s address that now.

Update Dockerfile

Unfortunately, when we work with Docker and Dockerfiles, we can only use the current folder or any child folders to copy content from. Docker cannot access parent folders to copy content, so we are going to have to change the context for where we run our docker commands. Furthermore, we need to copy our NuGet package folder so our project can use it as a NuGet source. So, let’s do that in our Dockerfile:

FROM mcr.microsoft.com/dotnet/aspnet:8.0 as base
WORKDIR /app

FROM mcr.microsoft.com/dotnet/sdk:8.0 AS build
ARG BUILD_CONFIGURATION=Release
COPY ["order-microservice/Order.Service/Order.Service.csproj", "Order.Service/"]
COPY ["local-nuget-packages/", "/local-nuget-packages/"]
COPY ["order-microservice/nuget.config", "./"]
RUN dotnet restore "Order.Service/Order.Service.csproj"

COPY ["order-microservice/Order.Service/", "Order.Service/"]
WORKDIR "Order.Service"
RUN dotnet build "Order.Service.csproj" -c $BUILD_CONFIGURATION -o /app/build

FROM build as publish
RUN dotnet publish "Order.Service.csproj" -c $BUILD_CONFIGURATION -o /app/publish

FROM base as final
WORKDIR /app
COPY --from=publish /app/publish .
ENTRYPOINT ["dotnet", "Order.Service.dll"]

First, we change two of our existing COPY commands to use the correct folder structure as we’ll be running from a parent folder when building our images. Then, we copy our local-nuget-packages folder, as well as our nuget.config file before we run dotnet restore. Before we build a new image, let’s consume the new library code and remove the duplicated code.

Replace Existing Code

First, we can remove the EventBus and RabbitMq folders, including any folders/classes inside. Next, we need to update our OrderCreatedEvent record so we can use the new Event record from the shared library:

using ECommerce.Shared.Infrastructure.EventBus;

namespace Order.Service.IntegrationEvents.Events;

public record OrderCreatedEvent(string CustomerId) : Event;

Similarly, we need to update our OrderApiEndpoint class to use the IEventBus interface from our shared library:

using ECommerce.Shared.Infrastructure.EventBus.Abstractions;

Finally, in our Program class, we update the using statement. Further, we need to call a new method to register our IEventBus interface:

using ECommerce.Shared.Infrastructure.RabbitMq;

var builder = WebApplication.CreateBuilder(args);

builder.Services.AddRabbitMqEventBus(builder.Configuration)
    .AddRabbitMqEventPublisher();

var app = builder.Build();

Let’s follow a similar set of steps for our Basket microservice next.

0% Complete