Coming back to our e-commerce application, we have a single microservice, our Basket microservice. The next step in the process for an e-commerce application is the checkout process, where we convert a basket to an order and begin the order fulfillment. So, for the rest of this chapter, we’re going to focus on our Order microservice, along with our message broker implementation:
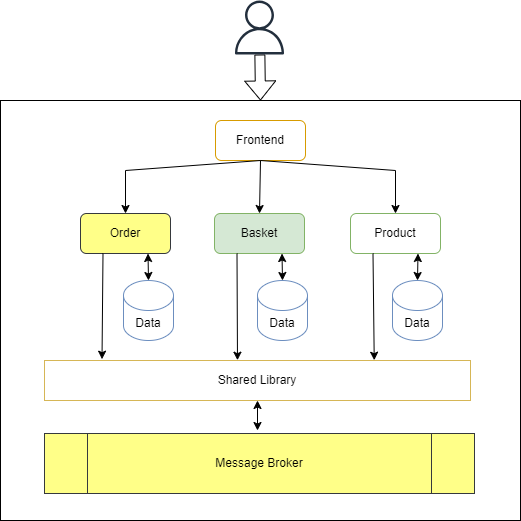
Of course, there are intermediate steps in this process, such as ensuring the customer is logged in, and has valid shipping and payment details, etc. However, to keep things simple for now, we’ll focus on one event in particular – ensuring a basket is deleted whenever the checkout process begins. We don’t want orphan baskets to remain in our Basket microservice, so we need some way of deleting this whenever an order is created. However, we don’t want to tightly couple the basket and checkout services, so we can utilize asynchronous communication in the form of queues: So, we have a plan for our next service, let’s waste no time!
Create Our Order Microservice
Luckily, we’ve got our environment already configured from Chapter 2: Environment Setup, so we can jump to creating the new project.
Generally, in the real world, different teams will own each of the microservices and therefore will create separate solutions for their microservices. So, let’s simulate the real world and do the same.
First off, at the same level as our previously created basket-microservice folder, let’s create a new folder, order-microservice:
mkdir order-microservice && cd order-microservice
Just like our Basket microservice, we’ll create a new solution:
dotnet new sln -n Order.Service
Next comes our project files:
dotnet new web -n Order.Service
We also opt for a web project, and we’ll once again expose some HTTP endpoints for interacting with our Order microservice.
The final step is to add our project to the solution:
dotnet sln add Order.Service\Order.Service.csproj
Before we start adding our domain objects, let’s open the launchSettings.json file and update our profiles so we only have the https profile:
{
  "$schema": "http://json.schemastore.org/launchsettings.json",
  "profiles": {
    "https": {
      "commandName": "Project",
      "dotnetRunMessages": true,
      "launchBrowser": false,
      "launchUrl": "swagger",
      "applicationUrl": "https://localhost:8001",
      "environmentVariables": {
        "ASPNETCORE_ENVIRONMENT": "Development"
      }
    }
  }
}
At the same time, we will set the port to 8001 for our Order microservice, so we don’t encounter any conflicts with the Basket microservice. Now we can start to define our domain objects.
Define Order Domain Objects
Like our Basket domain models, our Order microservice domain models will not be exposed outside of the Order microservice. The first domain model we need to consider is the list of products associated with an order. So, let’s create a Models folder and add the OrderProduct class:
internal class OrderProduct
{
    public required string ProductId { get; init; }
    public int Quantity { get; private set; }

    public void AddQuantity(int quantity)
    {
        Quantity += quantity;
    }
}
Here, we define an internal class, because we don’t expect this class to be consumed outside of the assembly. We have a few properties to denote a product. We define the ProductId as a required property that needs to be initialized when creating a new instance of our OrderProduct class. The Quantity property, although public, can only be set from within the OrderProduct class, using the AddQuantity() method. With our OrderProduct domain model defined, let’s proceed to create the Order class, once again inside the Models folder:
internal class Order
{
    private readonly List<OrderProduct> _orderProducts = [];

    public IReadOnlyCollection<OrderProduct> OrderProducts => _orderProducts.AsReadOnly();

    public required string CustomerId { get; init; }

    public Guid OrderId { get; private set; }
    public DateTime OrderDate { get; private set; }

    public Order()
    {
        OrderId = Guid.NewGuid();
        OrderDate = DateTime.UtcNow;
    }
}
Like the OrderProduct class, we define the Order class as internal. We start with a private readonly collection for our OrderProducts. Then, we expose this as an IReadOnlyCollection so consumers cannot add/remove products outside of the Order class. All orders need to be associated with a customer, so we define a CustomerId property as required.
Next, we have an OrderId to allow us to identify the specific order, along with an OrderDate to let us know when the order was created. We assign these properties in our constructor. Now, we need to add a method for populating our _orderProducts list:
public void AddOrderProduct(string productId, int quantity)
{
    var existingOrderForProduct = _orderProducts.SingleOrDefault(o => o.ProductId == productId);

    if (existingOrderForProduct is not null)
    {
        existingOrderForProduct.AddQuantity(quantity);
    }
    else
    {
        var orderProduct = new OrderProduct { ProductId = productId};
        orderProduct.AddQuantity(quantity);

       _orderProducts.Add(orderProduct);
    }
}
Here, we define the AddOrderProduct() method, which takes parameters that are required to create an OrderProduct. First, we check our _orderProducts collection for an existing product. If it exists, we call the AddQuantity() property to ensure the quantity for the product is set correctly. Otherwise, we create a new OrderProduct instance, and add it to our _orderProducts list.
Create Order Endpoint
With our domain models defined, we’re almost ready to define our first endpoint. Before we can do this, we need persistence for our orders. Like our Basket microservice, we’ll start with an in-memory store for now. So, following the Onion architecture pattern once more, let’s create the Infrastructure folder, and within this a Data folder. Then, we can define a new interface:
internal interface IOrderStore
{
    void CreateOrder(Models.Order order);
}
We create the IOrderStore interface, with a single method, CreateOrder(), which we’ll implement next. Now, let’s create an InMemoryOrderStore class, once again in the Infrastructure/Data folder:
internal class InMemoryOrderStore : IOrderStore
{
    private static readonly Dictionary<string, Models.Order> Orders = [];

    public void CreateOrder(Models.Order order) =>
        Orders[$"{order.CustomerId}-{order.OrderId}"] = order;
}
Here, we implement the IOrderStore interface. We use a Dictionary to store our orders in memory and use a combination of the CustomerId and OrderId as our key when setting the value. With our store created, we can proceed to define our first endpoint. To keep things clean in our Program class, we’ll create a new folder, Endpoints, and within this folder define a new class to contain our Order endpoints:
public static class OrderApiEndpoints
{
    public static void RegisterEndpoints(this IEndpointRouteBuilder routeBuilder)
    {
    }
}
This is the same setup we had with our Basket service. To create our first endpoint, we need a DTO to store the data we expect when creating a new order. So, in a new folder ApiModels, we’ll define the CreateOrderRequest and OrderProductDto records:
public record OrderProductDto(string ProductId, int Quantity);

public record CreateOrderRequest(List<OrderProductDto> OrderProducts);
To create a new order, we expect a list of products. Each product should have a ProductId and a Quantity. Now we can proceed to create our endpoint in our OrderApiEndpoints class:
routeBuilder.MapPost("/{customerId}",
    ([FromServices] IOrderStore orderStore,
     string customerId,
     CreateOrderRequest request) =>
{
    var order = new Models.Order
    {
        CustomerId = customerId
    };

    foreach (var product in request.OrderProducts)
    {
        order.AddOrderProduct(product.ProductId, product.Quantity);
    }

    orderStore.CreateOrder(order);

    return TypedResults.Created($"{order.CustomerId}/{order.OrderId}");
});
Here, we define a POST endpoint, which requires a customerId parameter, as well as our CreateOrderRequest record. Also, we use the [FromServices] attribute to inject our IOrderStore interface. Within the endpoint, we instantiate a new Order object with the customerId.
Then, we iterate through the OrderProducts list, calling the AddOrderProduct() method to add them to the domain model. Finally, we persist the order to our store with the CreateOrder() method and return a Created result, which translates to a 201 Created HTTP status code. Also, we include the customerId and orderId properties in the constructor, which sets the Location HTTP header to the relative URL consumers of our API can use to retrieve the created order.
Additionally, we need to register our services and endpoints in the Program class:
var builder = WebApplication.CreateBuilder(args);

builder.Services.AddScoped<IOrderStore, InMemoryOrderStore>();

var app = builder.Build();

app.RegisterEndpoints();
Before we can truly test our create order endpoint, we should implement the functionality to retrieve orders, so we can verify the created order has been saved in our store. So, let’s do that now.
Get Order Endpoint
To start, we need a new method in our IOrderStore interface:
Models.Order? GetCustomerOrderById(string customerId, string orderId);
Here, we define the GetCustomerOrderById() method, which takes the customerId and orderId as parameters. We set the return as nullable, as we don’t want to create an order if one doesn’t already exist.
Now let’s implement this method in our InMemoryOrderStore class:
public Models.Order? GetCustomerOrderById(string customerId, string orderId) =>
Orders.TryGetValue($"{customerId}-{orderId}", out var order) ? order : null;
We use the TryGetValue() method, using our customerId and orderId parameters as the combined key. If the order exists we return it, otherwise we return null. The final step is to create our GET endpoint in our OrderApiEndpoints class:
routeBuilder.MapGet("/{customerId}/{orderId}", IResult
    ([FromServices] IOrderStore orderStore,
     string customerId,
     string orderId) =>
{
    var order = orderStore.GetCustomerOrderById(customerId, orderId);

    return order is null
      ? TypedResults.NotFound("Order not found for customer")
      : TypedResults.Ok(order);
});
Here, we use the MapGet() method, taking the customerId and orderId as parameters. For our delegate, we need to define the return type, IResult in this case, as we can return different types depending on whether the order exists. In our delegate, we call our previously defined GetCustomerOrderById() method, returning an Ok result along with the order if it exists. If we get a null value back from the store, we return a NotFound result. Now we’re ready to test our two endpoints – so let’s do that next!
Testing Create and Get Order Endpoint
For now, we’ll run our Order microservice with the dotnet run command, or optionally through Visual Studio. With our Order microservice running, let’s open Postman and define the OrderMicroserviceBaseAddress variable with the value of our running application, https://localhost:8001. Now, we can proceed to test our create order endpoint:
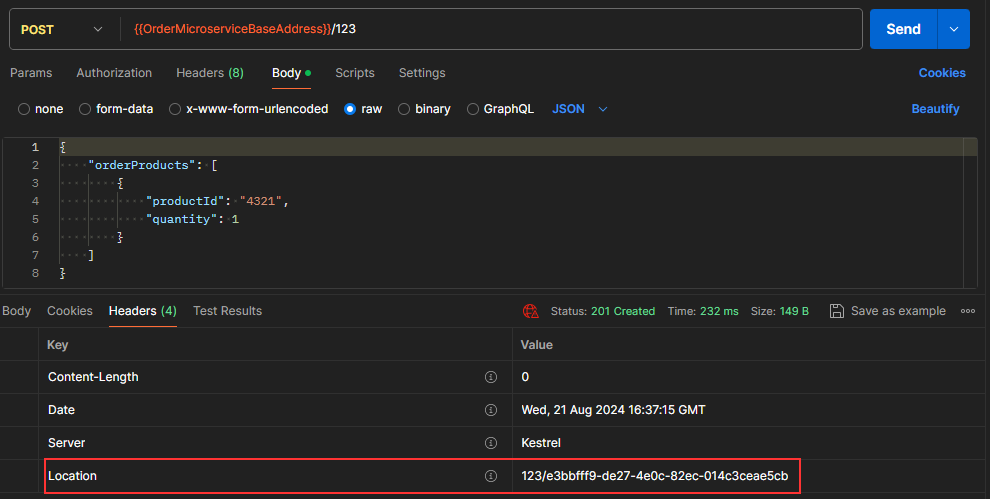
Sending a request to /123 with a valid body, we see a 201 Created response. Alternatively, we can use a curl command to test our endpoint:
curl --location 'http://localhost:8001/123'
-i
--header 'Content-Type: application/json'
--data '{
    "orderProducts": [
        {
            "productId": "4321",
            "quantity": 1
        }
    ]
}'
With our curl command, we must include the -i flag, so the response in the console shows the headers. Whether we use Postman or Curl to send our request, if we check the headers, we see the Location header set with the CustomerId and OrderId. We can use this to make a GET request to our microservice:
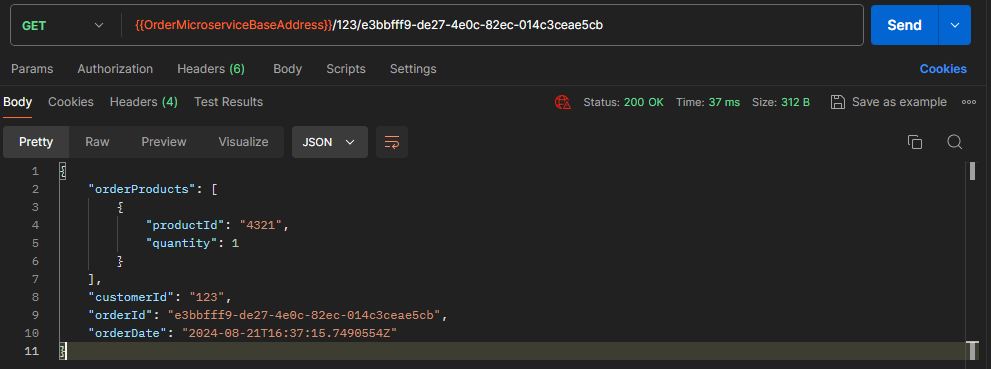
The curl command is also straightforward:
curl -location 'http://localhost:8001/123/e3bbfff9-de27-4e0c-82ec-014c3ceae5cb'
Great!
Both our create and get order functionality is working as expected. But remember what we discussed earlier? Whenever an order gets created, we need to delete the basket for the customer, as it is no longer needed, which brings us to the topic of events.